Inputs allow you to measure external voltage, for example the state of a device or the voltage of another battery, or to use inputs to switch outputs on/off based on the input state.
You can also configure alerts for inputs, so that changes in input state can trigger alerts in the app.
You can set an input to display voltage, state (ON/OFF), or voltage as a percentage using scaling values.
Input Advanced Settings - 1
Access the input advanced settings by tapping the gear icon in the top-right corner of the input in the app.
You can give the input a name, which is displayed on the app's main screen and helps identify the purpose of each input.
You can choose whether to show the input state (ON/OFF) on the main screen, how long the input has been in the ON state, and whether to display the voltage as a percentage based on scaling values or as a direct voltage value.
You can also choose whether to show the state/voltage history on the main screen, which displays changes in input state and voltage fluctuations as a graph.
Input Advanced Settings - 2
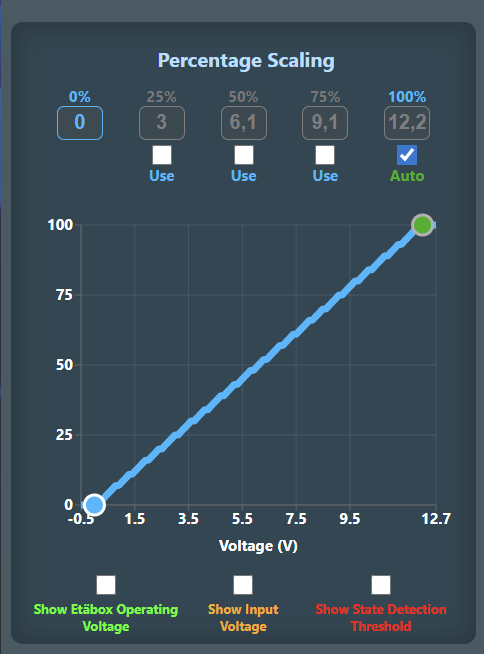
Here you can define the voltage-to-percentage scaling values for the input, which determine how the input displays percentages on the main screen.
For example, you can set 0V = 0% and 10V = 100%, so the app shows the input state as a percentage.
This is especially useful when you connect a sensor to the input, such as a water level sensor that measures water height and outputs a voltage proportional to the water level. You can set 0V = 0% (empty) and 5V = 100% (full), so the app shows the water level as a percentage, which is easier to understand than a raw voltage value.
If the voltage is not linear, you can define multiple scaling points so the app can show percentages correctly.
Input Advanced Settings - 3
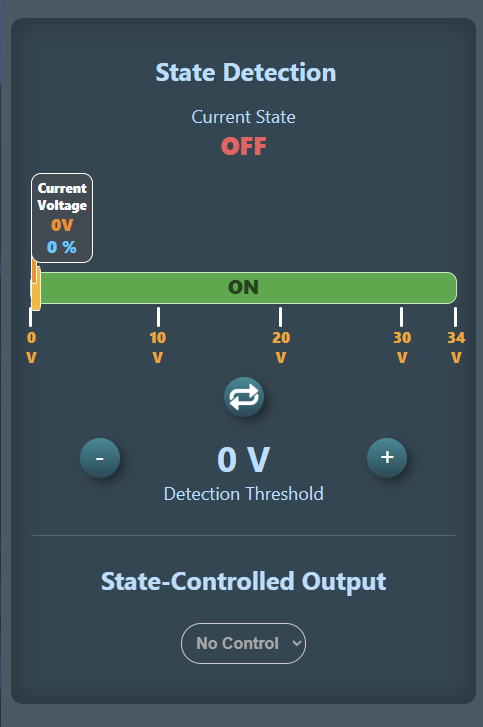
Here you can set the threshold voltage for the input state, which determines at what voltage the input switches from ON to OFF state or vice versa.
For example, if you set the threshold voltage to 2V, the input is in the OFF state when the voltage is below 2V and in the ON state when the voltage is above 2V.
Alternatively, you can set the input to be in the ON state when the voltage is below 2V and in the OFF state when the voltage is above 2V by pressing the "Invert" button in the center.
Once the threshold voltage is set, you can use the input to switch outputs on/off based on the input state. For example, you can configure a specific output to turn on when the input is ON and turn off when the input is OFF. This way you can use inputs and outputs together to create more complex automation rules.
After setting the controlled output, you can also choose whether the input's ON state only turns the output on (ignoring the OFF state), or whether the output follows the input state in both directions, turning the output on when the input is ON and off when the input is OFF.